|
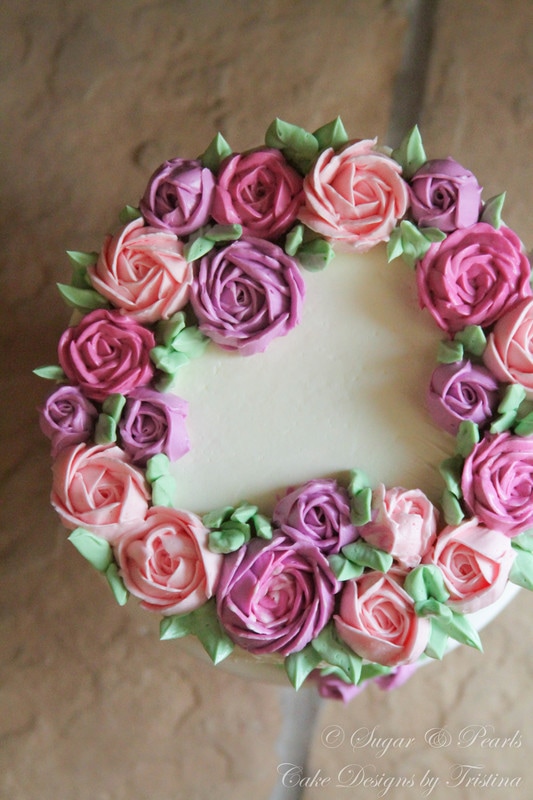
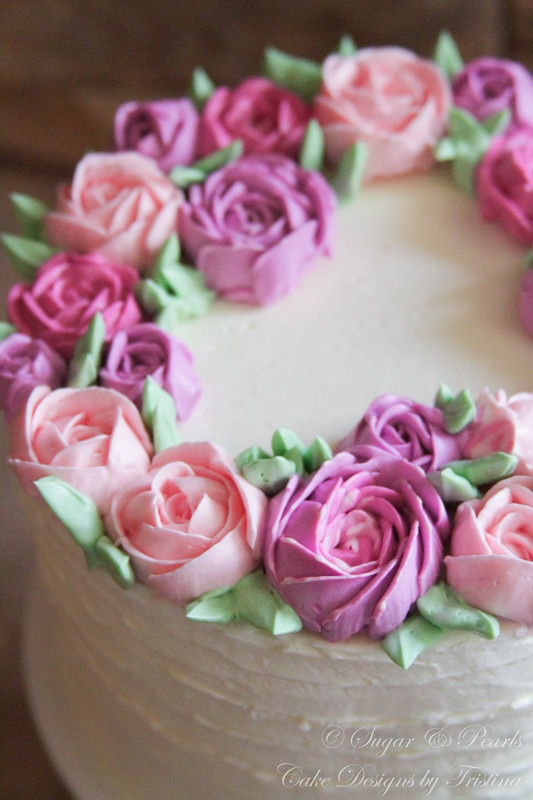
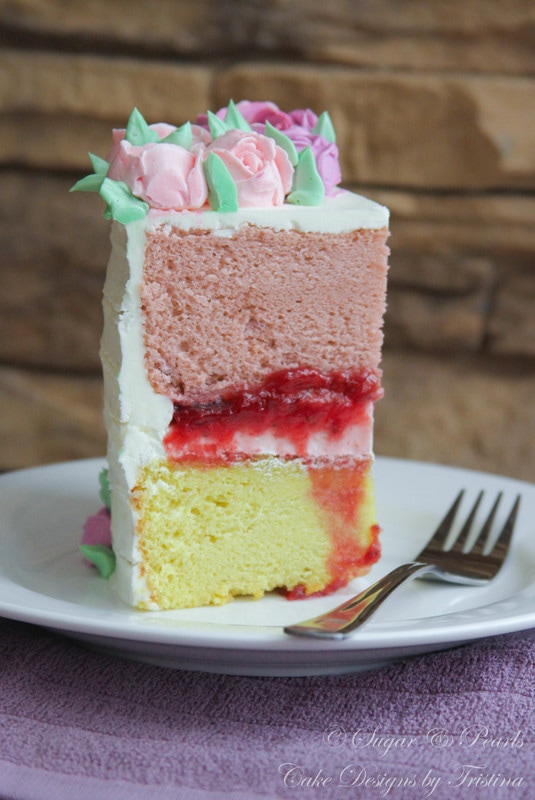
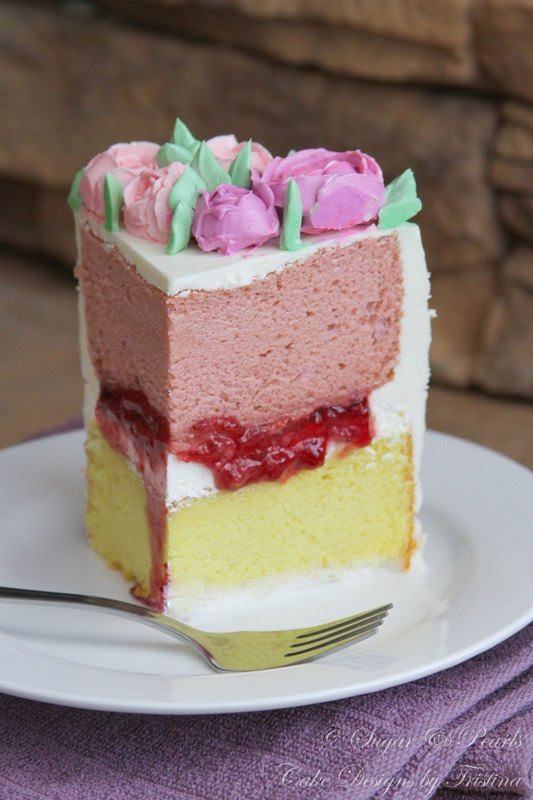
~ This posting is dedicated to my one and only best friend, my mother. I love you, Mom! ~ 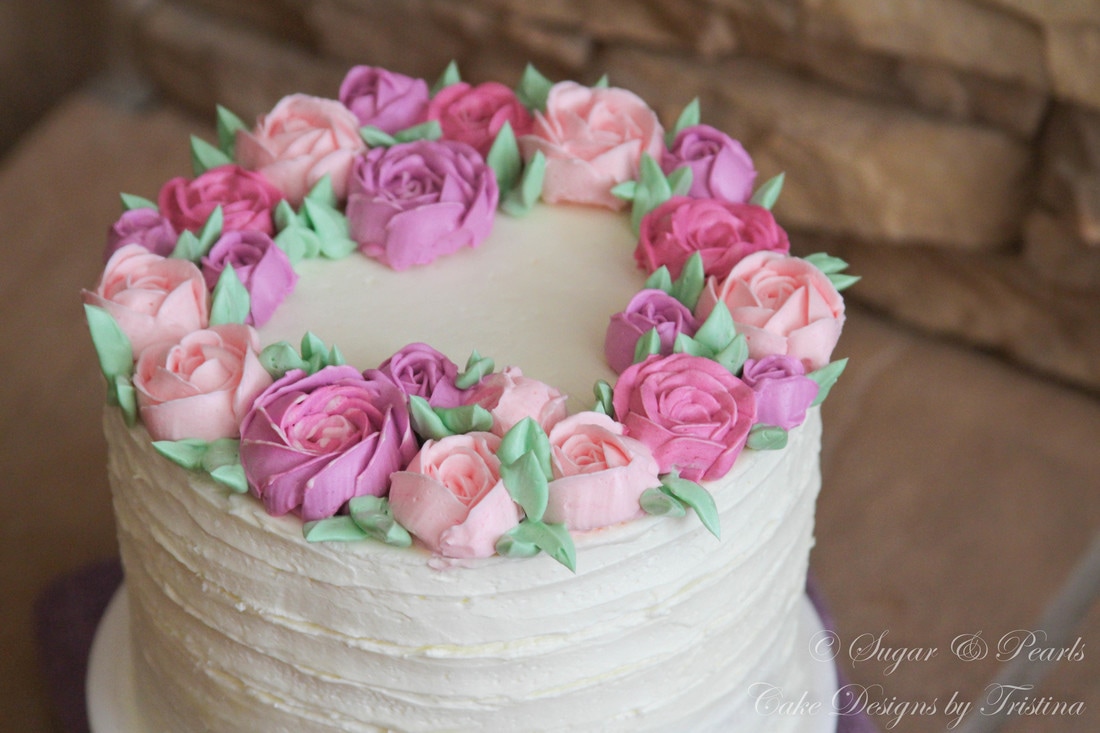 Happy Mother's Day! This year I don't get to celebrate this day with Mom as she is still in Vietnam with Dad, visiting my grandmother who has not been feeling well. No worries, we will be celebrating Mother's Day "late" when she comes back next week. Since this is Mother's Day, it is the perfect time to recognize Mom, and how much I appreciate everything she does for our family. Mom is the pillar of our family. She really is "the glue" that holds us together, and that includes her grand kids. Growing up in a family of ten siblings in the inner city of Saigon, Mom barely had enough food to eat leave alone money for schooling. As a strong-will woman she is, Mom never let that prevented her from obtaining an education; she knew the only way to climb the poverty ladder was to do well in school—an important lesson she has taught me since I was a little girl. Mom did what she knew was best. With two torn school uniforms, my mother nibbled on dried breads and water and saved every dime for school tuition through four years of high school. She never missed a day of class, though it meant going to bed with a growling stomach or skipping breakfast every morning. Grandfather eventually acknowledged her motivation, and worked extra shifts to keep Mom in school. Hard work had paid off the day Mom graduated from high school and a college degree just immediately before the Fall of Saigon. Mom was the first in her family to earn a high school degree. It may seem conventional in today's world, but graduating from high school in Vietnam back in the 1970s was a huge achievement. Today, Mom is a grandmother of four energetic, amazing children. She never stopped "working" for us, although she has been a house wife for more than 15 years now. I can always rely on Mom to cook the most comforting meal after a long day at work, or a week worth of food "to-go" home for my kids. She still gives us the best of her everything, while we have ten times, if not hundred, more than what she had during her childhood. But Mom only knows one thing: to give and to continue to give, and does not take back. Perhaps, only a mother's love is truly an unconditional love. I took some of my Mom's sacrifices for granted growing up. Fortunately, I learn to love and appreciate her more and more each day, as I become an adult and especially a mother myself. I probably will never be able to "be" like Mom. I have been so adjusted to the Westernize world to fully understand the sacrifices she had made for us, but I tried to be there for Mom as much as I can. Just like how much she was always there for my family and me for the last 34 years. 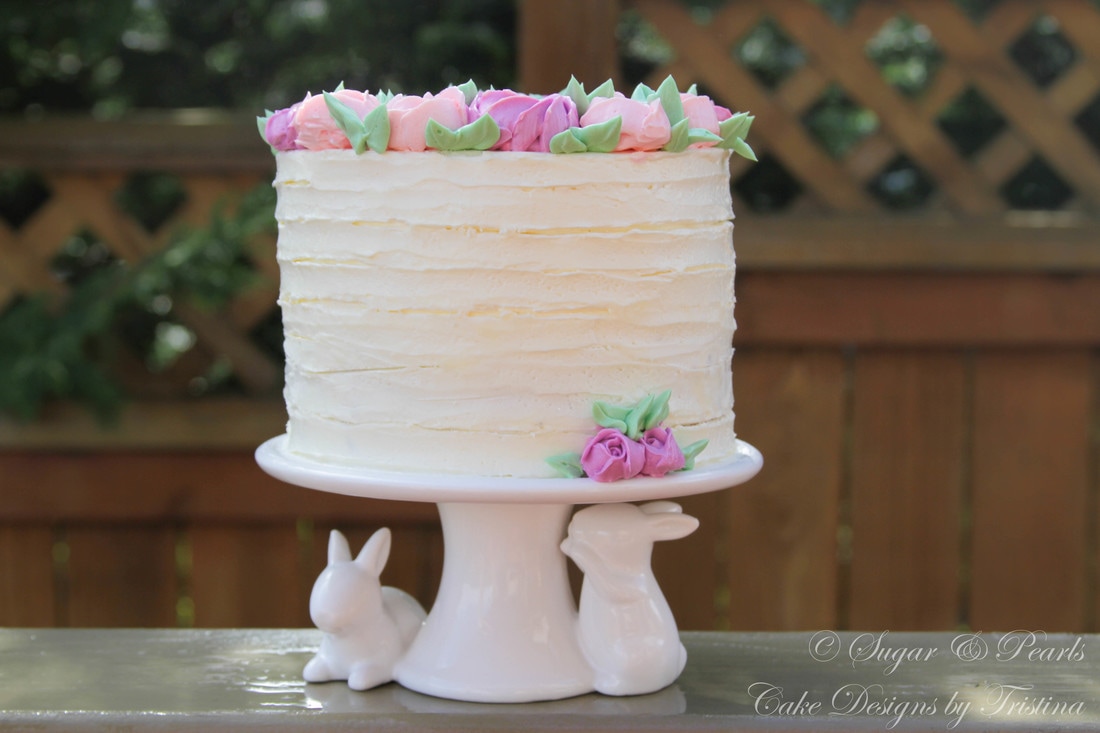 Now, back to this simple, pastel buttercream cake with soft pink and purple roses. This is my first attempt to pipe buttercream flowers. Don't mind me if the flowers are not in their best shapes. I promise as I get more practice with piping buttercream, I will become better at it. Given that this is my first all buttercream cake, it is also the quickest cake I have ever made. How did this cake come to live? Earlier this week, my sisters-in-law were inquiring what to make for Mother's Day dinner for my mother-in-law. I know that I would be at work all day, thus making a dish to bring to the event is almost impossible. So I turned to what I do best: baking and decorating a cake, and plus I could get this done the night before! To be honest, my husband's family does not like cakes, so most of the time I avoid baking completely. However, after giving some thoughts, and I decided that I am going to make a small cake anyway. After all, it's about time to make a first cake for my mother-in-law. I love how this Mother’s Day Roses Cake turns out so much that I cannot bring myself to cut it after our dinner. I love the pastel shade of the roses, and the light green leaves that flawlessly weaved into the flowers. And, of course, the imperfections frosting around the cake yields a simplistic, yet elegant look. 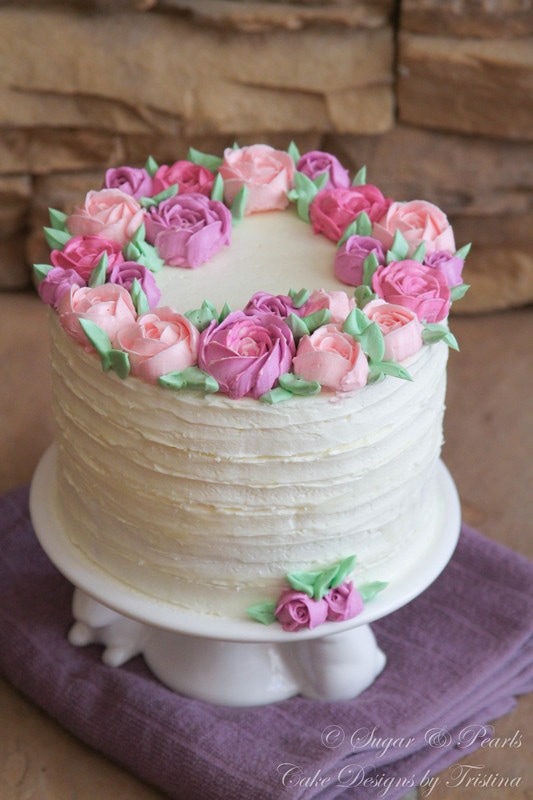 MAKING CHIFFON CAKE First, I beat the egg yolks with granulated sugar until light and fluffy on medium high speed in a stand mixer for about 2 minutes. Lowering the speed, I add the liquid mixture of orange juice, vegetable oil and vanilla extract and beat for another 30 seconds until everything is well combined. Then I sift cake flour, salt and baking powder over the egg yolk batter in 3 additions, and fold until the mixture is combined. You may use the whisk and beat it on the lowest speed for about 1 minute as well. In a clean mixing bowl, on medium speed with a whisk attachment, I beat the egg whites until foamy. Without stopping the mixer, I add a pinch of tartar and continue to beat the egg whites at the same speed until soft peak forms. I add granulated sugar and continue to beat the egg whites at high speed just till before stiff peak forms. Then, I fold the egg whites gently over the egg yolk batter in 3 additions using a spatula until the batter becomes smooth and homogeneous. I pour the cake batter into the prepared 6-inch cake pan that has been lined with parchment paper on the bottom. Chiffon cake needs to cling to the pan to rise, thus it is important not to grease the sides with baking spray or butter. I bake this chiffon cake on the lowest rack, at 320 degrees F for about 10 minutes, and then reduce the oven temperature to 285 degrees F and bake for another 25-30 minutes. A trick to make the cake moist is to place an ovenproof cup or pan of water on the lowest rack while baking. I tried this for the second layer and thought it was moister than the first one. A sign indicating the cake is ready when you can smell a strong, amazing aroma of chiffon cake. Be careful not to over bake the cake, as it would lead to a drier cake. Once done, immediately remove the cake from the oven and invert it onto the cooling rack. It is important to do this as chiffon cake will collapse onto itself and cause the cake to "deflate" in the center of the cake. Here, the first layer (bottom) is baked with orange juice and the second layer (top) is baked using milk instead. I also add purple food coloring to create this pastel purple color for it. You do not have to do this and can keep it simple by using milk or water for the liquid ingredient. MAKING VANILLA MOUSE AND STRAWBERRY FILLING Vanilla mousse is relatively simple to make and tastes extremely delicious on any cake. I leave my cool whip on the counter for about 5-10 minutes, and then put it in a clean mixing bowl and beat for about 2-3 minutes. I stop just to add vanilla pudding powder and continue to beat on high speed for another 3-4 minutes, or until it becomes smooth and slightly fluffy (see picture below). Strawberry filling is easy as well. I happen to have some fresh strawberries left over and decide to make strawberry syrup. In a small saucepan, I cook fresh strawberries with granulated sugar over medium-low heat until it becomes syrup-like, about 5-10 minutes. Then, I add some fresh lemon juice to enhance the strawberry flavor and cook for another 1-2 minutes. I remove the saucepan from the stove and leave it on the counter to cool. The strawberry filling will be slightly thicker overnight. MAKING VANILLA WHIPPED BUTTERCREAM I leave the butter out on the counter for at least 1-2 hours to soften, which helps to speed up the process when making buttercream frosting. In a clean mixing bowl, I beat the softened butter for about 2-3 minutes on medium high speed. I add powdered sugar, vanilla pudding powder and vanilla extract and beat on the same speed for another 2 minutes. To make the frosting more fluffy, I add milk slowly, one tablespoon at a time, until I achieve the desired consistency. ASSEMBLE THE CAKE When the chiffon cake layers are completely cool, I start out by leveling the cake and then stacking them together. These layers are about 1.75 inch tall each. I place the orange-flavored chiffon cake layer first (bottom), following by vanilla mouse then strawberry filling. Since strawberry is syrupy and can leak out of the cake, I pipe a "dam-like" buttercream frosting around the cake before filling the center with strawberry. Then I stack the purple chiffon cake layer on top, and crumb coat the cake with vanilla whipped buttercream. Once done, I chill the cake for about 15 minutes and then finish applying the final frosting layer around the cake. For the buttercream roses and leaves, I use light purple, light pink and green food gels to color the vanilla whipped buttercream. Using the Wilton tip #127, I pipe the pink roses first and space them about an inch apart around the top of the cake. Then I pipe medium pink roses and light purple roses and line them around the "cake-ring" entirely. Noted here, I mixed purple and pink to create the medium pink color roses. Finally, using the Wilton tip #352, I add green leaves among the flowers to cover some big gaps and hide the "flaws" of certain flowers. ***Sorry, I did not remember to take pictures of the piping roses and leaves. The uneven layers around the cake are made using a off set spatula and run around the cake, one after another, topping each other until the entire cake is done. I also use the side of the spatula to make the indent lines slightly deeper.
Though this buttercream-rose cake seems to include a lot of steps, it is the fastest cake I have made this year. Honestly, the decoration part took me less than one hour, and remember, this is also my first attempt making buttercream flowers. So I imagine I can make this faster the second or third time around. 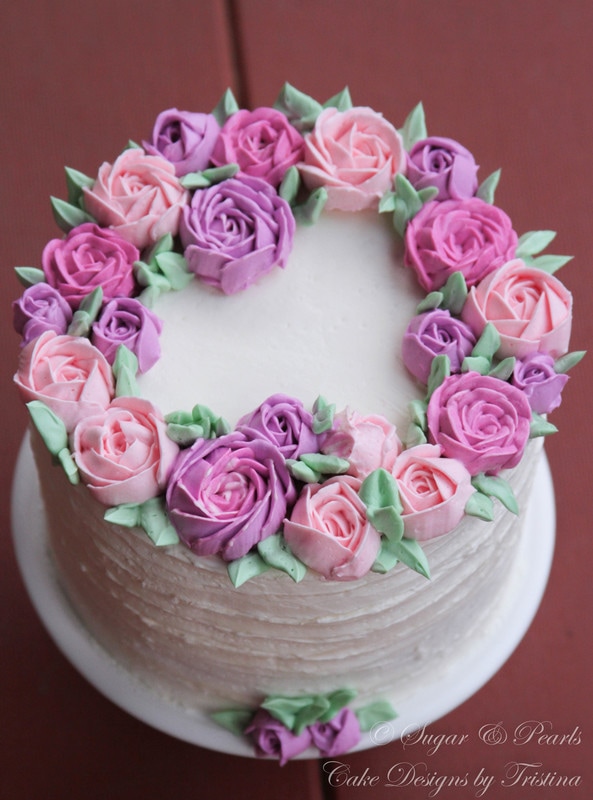 I have to say I got really lucky when it comes to photographing this cake. I was hoping to capture the photos outside of the house to give some natural feel to the cake. It was a wishful thought as I glared through the window and saw pouring rain along with hailing outside. It was a very gloomy day, and I thought to myself, "darn it, these pictures will look gloomy as well."
But I lucked out, because as soon as I took my camera out, the beautiful sun came out. I could not be any happier. The natural sunlight sure made this cake more beautiful. xoxo, Tristina Vanilla Chiffon Cake Recipe Make: 6-inch cake (about 1.75 inch tall) Total time: 2 hours Ingredients
Instructions
*This cake recipe is adapted from Cookpad. Vanilla Mouse RecipeIngredients
Instructions
Homemade Strawberry Filling RecipeIngredients
Instructions
Vanilla Whipped Buttercream RecipeIngredients
Instructions
COPYRIGHT © 2017 - SUGAR & PEARLS ~ CAKE DESIGNS BY TRISTINA
0 Comments
Your comment will be posted after it is approved.
Leave a Reply. |

AboutTristina TiepNhu Nguyen is a pharmacist by weekday and a baker by weekend. She is also a wife and a mother of two children. Free Cake Tutorials!Sign up for my newsletter and you will be the first to know about my new recipes and cake tutorials!
Recent Posts
August 2020
RecipesTutorials |
|
|
sugar & pearls |