Unicorn Rainbow Cake
November 3, 2017

After a number of days tinkering with many ideas, my daughter Averie, and I have finally came to a conclusion to celebrate her fifth birthday with a magical unicorn theme. Actually, I had to slightly convince her to pick this theme because she was into Hatchimals and wanted that as a birthday theme. Trust me, I have tried looking into making a Hatchimals party, but I did not get far. Honestly, I have no idea what is the meaning behind Hatchimals aside from they’re animals hatching from the spotty purple eggs. There were many Hatchimals that she couldn't decide which one she wanted to have as a main cake. So, I persuaded her be the "magical princess," gave her the authority to pick out her favorite colors (pink), promised to bake a chocolate cake, and she's sold within matter of minutes!
Since this is a fondant cake, it did take a good amount of work to prepare for it. Luckily, I had planned this birthday accordingly to schedule so I had some times to work on perfecting the toppers and drew all the layouts of how I wanted the cake to look like. This sounds so professional and all, but it is definitely a helpful step for me that I oftentimes skipped due to lack of time. Thankfully for this that I was able to dive into making the cake with a lot less error and more time to mold these fondant figurines.
Since this is a fondant cake, it did take a good amount of work to prepare for it. Luckily, I had planned this birthday accordingly to schedule so I had some times to work on perfecting the toppers and drew all the layouts of how I wanted the cake to look like. This sounds so professional and all, but it is definitely a helpful step for me that I oftentimes skipped due to lack of time. Thankfully for this that I was able to dive into making the cake with a lot less error and more time to mold these fondant figurines.
PREPARING FOR THE DECORATIONS
Please don't laugh at me but I started making the topper about 2 weeks before the birthday party. I say this is a luxury for planning ahead and knowing what to make. I started out making the unicorn topper first because I know it would require some extra time to hold its shape. I also needed to make all my fondant in all of the colors as well.
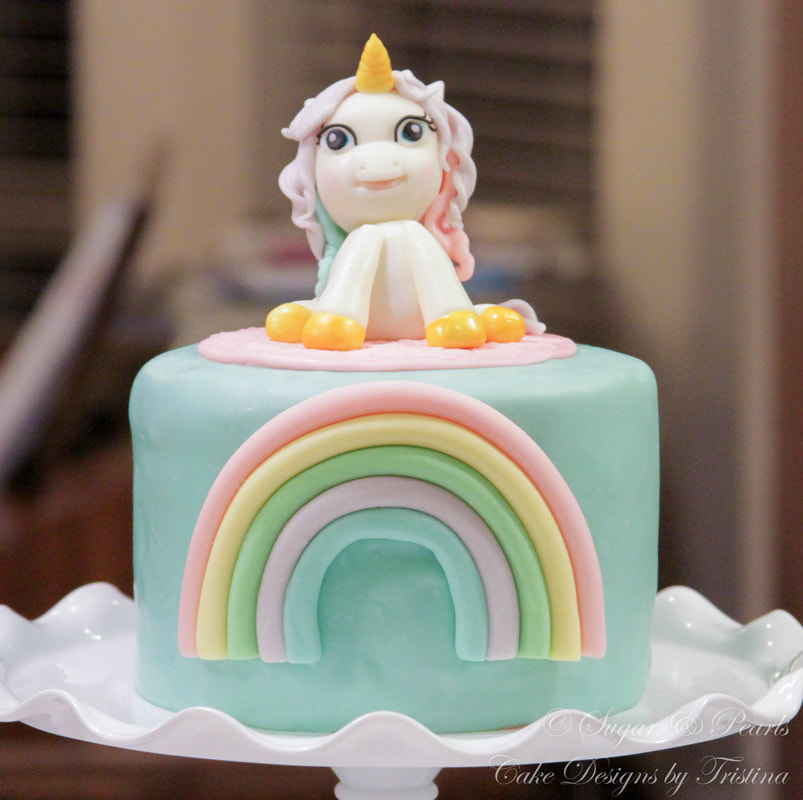
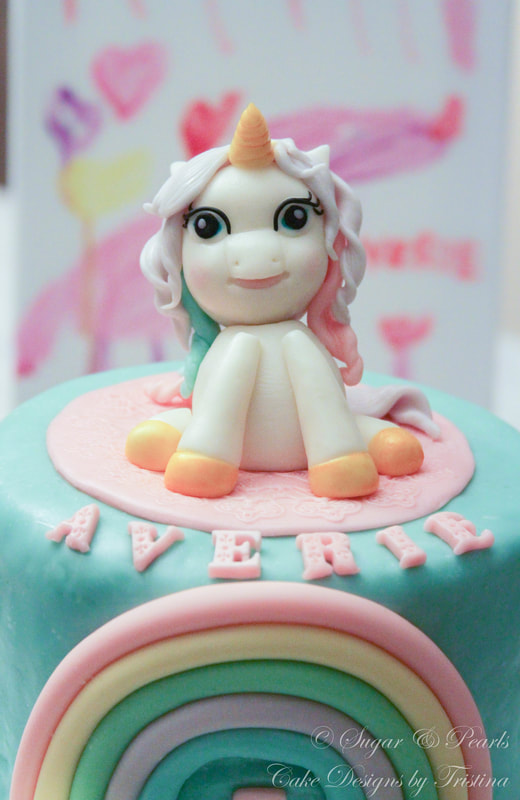
Unicorn Topper
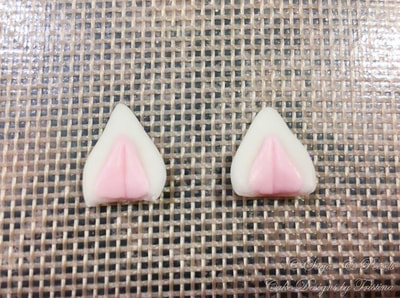
I used white fondant to make the horn and the ears first. For the horn, I rolled out a thin string and used the toothpick for guidance. I swirled around the stick and layered the string on top of each other. Next, I used a flower petal cutter to make 2 ears from white fondant, then I added a layer of pink fondants using the same shape and trimmed them in half. I glued this on top of the white "ears" and I leave these over a few days to dry.
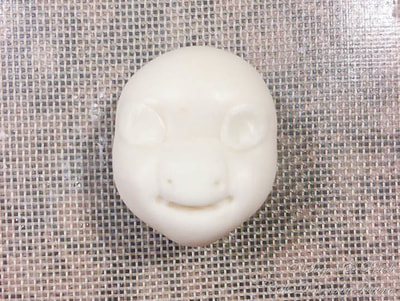
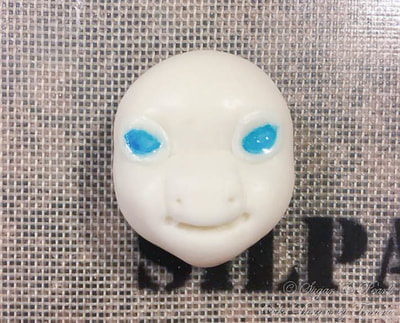
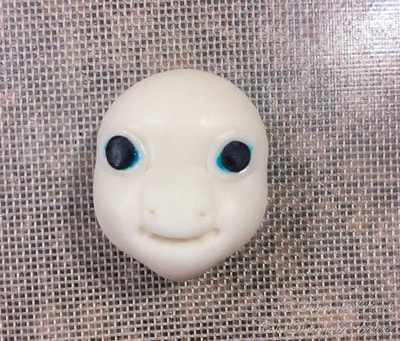
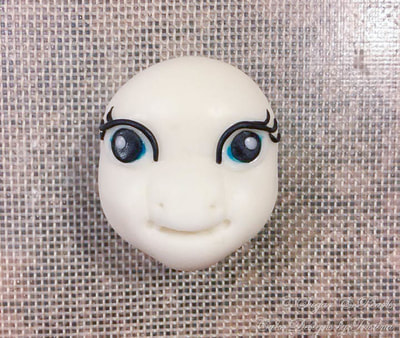
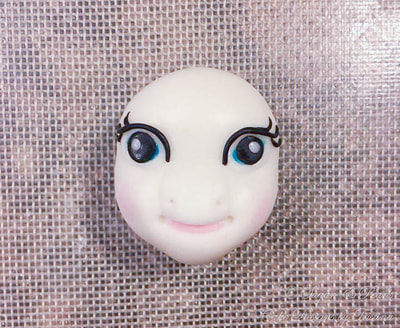
I started out making the head of the unicorn the following day. I rolled out a round fondant ball and molded the shape of the forehead and the eye-sockets first, following by the ridge of the nose and the mouth. I shaped the entire face feature using my pinkie. I used the tip of the toothpick to make 2 small holes for the nose and using the bigger end of the toothpick to make the indents on the sides of the mouth. Once I was happy with the shape of the face, I cut out 2 round white fondant to stick it onto both eye sockets and slightly tint them turquoise. I cut two round black fondants to add into the eyes to make the "iris" following by the smaller white circles. To make the eye lids, I rolled out a thin black strip of fondant and line the top of both eyes, following by eyelashes. For the mouth, I added a piece of pink fondant and glued it inside to reflect a "pink tongue." I added a pink dust for the rosy cheeks and leave the head over a few days to dry.
Please don't laugh at me but I started making the topper about 2 weeks before the birthday party. I say this is a luxury for planning ahead and knowing what to make. I started out making the unicorn topper first because I know it would require some extra time to hold its shape. I also needed to make all my fondant in all of the colors as well.
Unicorn Topper
I used white fondant to make the horn and the ears first. For the horn, I rolled out a thin string and used the toothpick for guidance. I swirled around the stick and layered the string on top of each other. Next, I used a flower petal cutter to make 2 ears from white fondant, then I added a layer of pink fondants using the same shape and trimmed them in half. I glued this on top of the white "ears" and I leave these over a few days to dry.
I started out making the head of the unicorn the following day. I rolled out a round fondant ball and molded the shape of the forehead and the eye-sockets first, following by the ridge of the nose and the mouth. I shaped the entire face feature using my pinkie. I used the tip of the toothpick to make 2 small holes for the nose and using the bigger end of the toothpick to make the indents on the sides of the mouth. Once I was happy with the shape of the face, I cut out 2 round white fondant to stick it onto both eye sockets and slightly tint them turquoise. I cut two round black fondants to add into the eyes to make the "iris" following by the smaller white circles. To make the eye lids, I rolled out a thin black strip of fondant and line the top of both eyes, following by eyelashes. For the mouth, I added a piece of pink fondant and glued it inside to reflect a "pink tongue." I added a pink dust for the rosy cheeks and leave the head over a few days to dry.
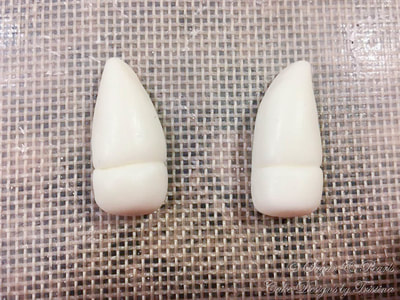
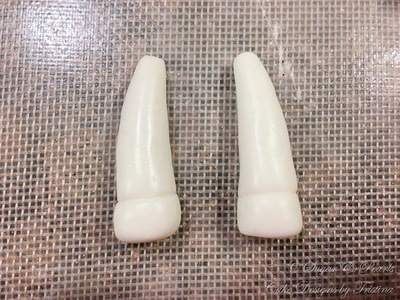
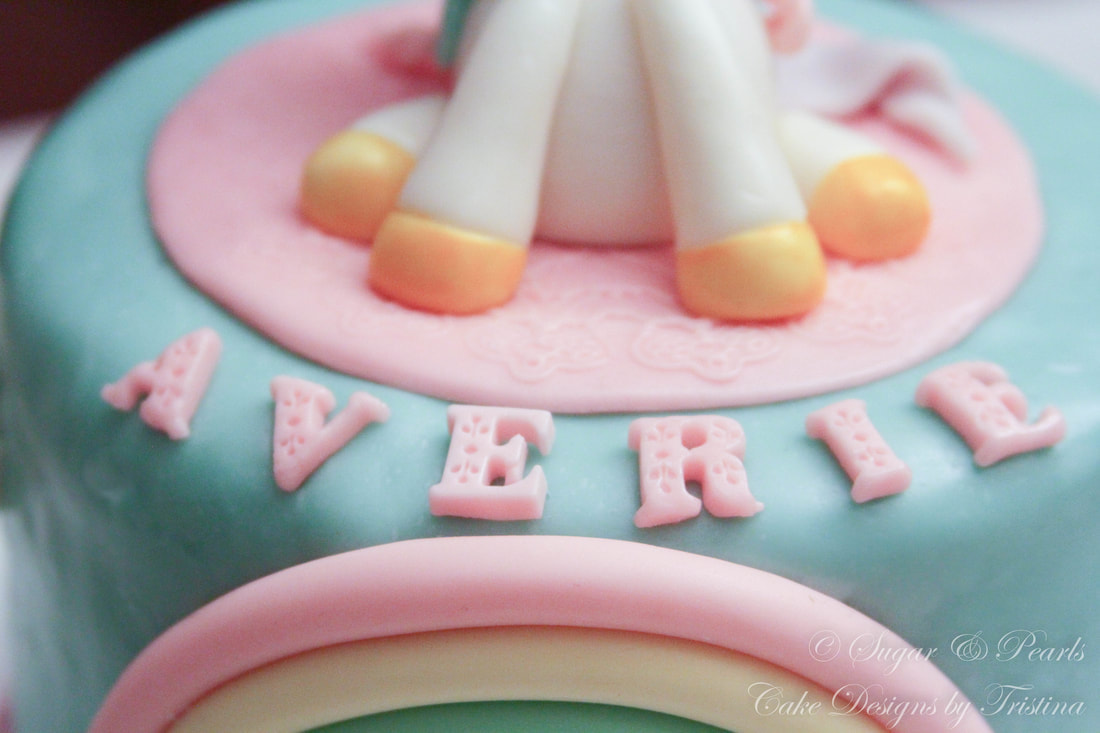
I made another smaller white fondant ball for the body. I molded the ball into a slightly oblong shape and put a toothpick inside the middle of the ball, where it would hold the head. Then I rolled out a 3/4 inch string of white fondant and cut in 4 different pieces of about an inch long. I used two strings to make the arms and 2 strings to make the legs. I continued to roll the legs and the arms slightly smaller at the top, allowing the "feet" and "hands" to be slightly bigger. I left all of these over a few days to dry before I colored them in gold lemon with tinted gold dust. Here, I also colored the horns as well.

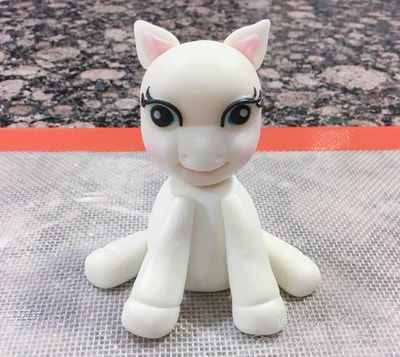
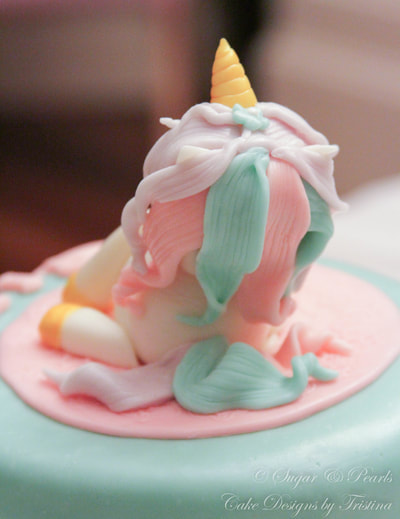
About 10 days before I baked the cake, I put the unicorn pieces together, by placing the head onto the body (stick it onto the toothpick) with water. To make the hair, I rolled out different shape and length of fondant using the three main color: purple, pink and turquoise. I used my fondant tool to create the texture for each fondant hair pieces, and glue them on top of the head. This step does not require you to follow certain way; you are free to create messy hair as desired. I wanted the unicorn to be on a "girly side" so I added a lot of long wavy hair. But I have definitely seen some simple, yet very cute unicorn with less hair than this. Then I glued the horn and ears on top of the head, following by a flower on the top.


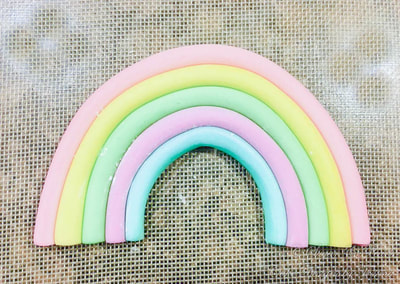
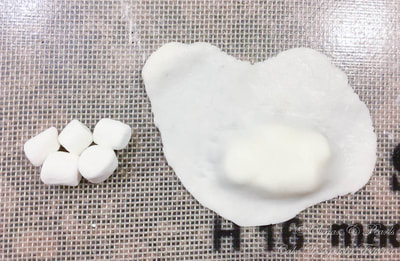
Rainbow and Clouds
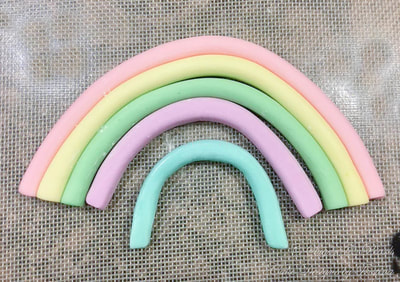
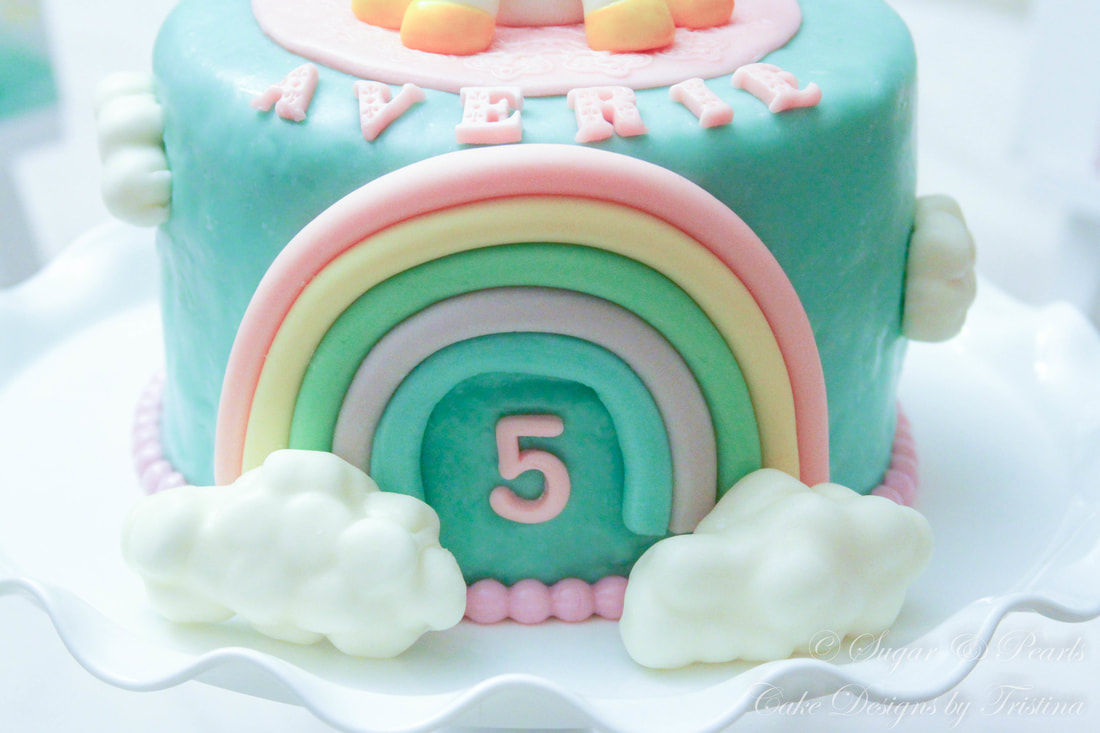
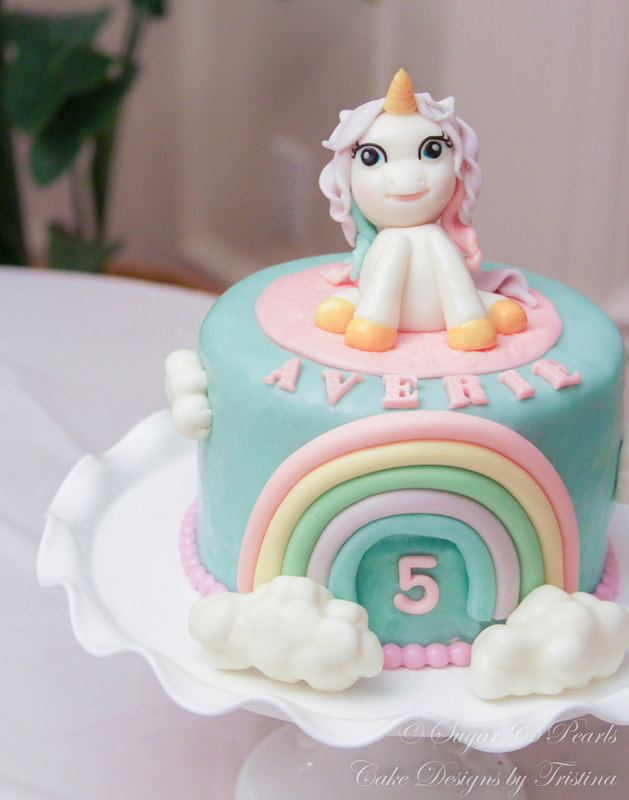
It is very simple to make the rainbow. I first rolled out a string of about 1/5 inch thick of fondant in five different colors to reflect the palette that we picked out earlier: yellow, purple, pink, turquoise, and green. I lined them up horizontally along each other and bent them down in a slight curve until I have a desired shape. I trimmed the bottom of the strings to even them out. Using water, I glued the strings together and set over 5 days to dry. I wanted to make this ahead so the rainbow could stand on its own if needed.
I made the cloud "puffs" using white marshmallows since I didn't want to use a bunch of white fondant balls. I glued the marshmallows puffs together using water and shaped them into a semi-cloud figure. Then, I rolled out a think white fondant sheet and draped it over the puffs. I trimmed the excess fondant and folded them along the edges of the clouds. I gave the clouds finish touch by making some light indents around the top to make the puffs more round. I made two large clouds that I want to go below the rainbow and a few small ones to place around the cake. I leave these clouds over a few days to dry.

ASSEMBLING THE CAKE
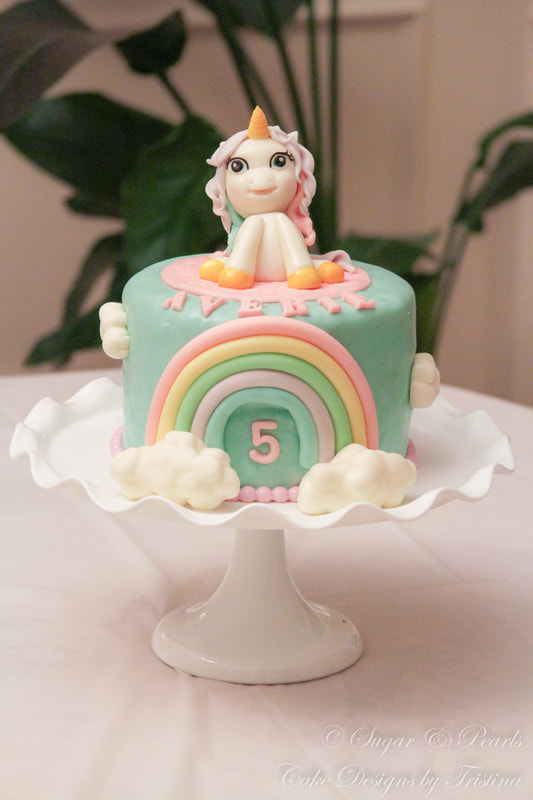
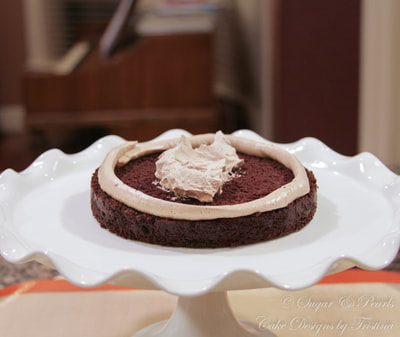
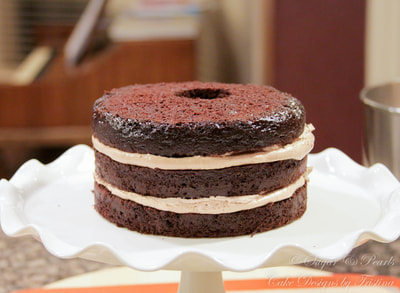
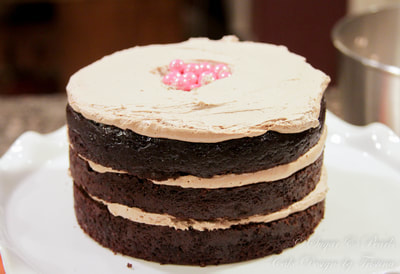
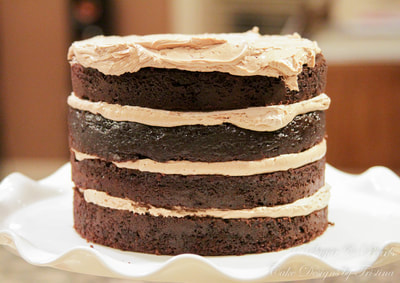
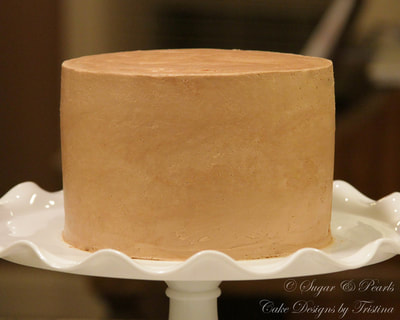
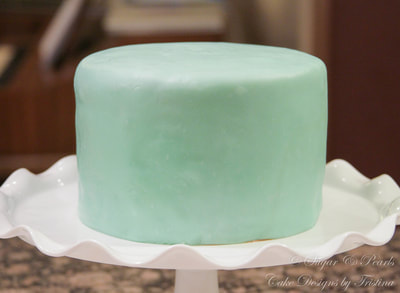
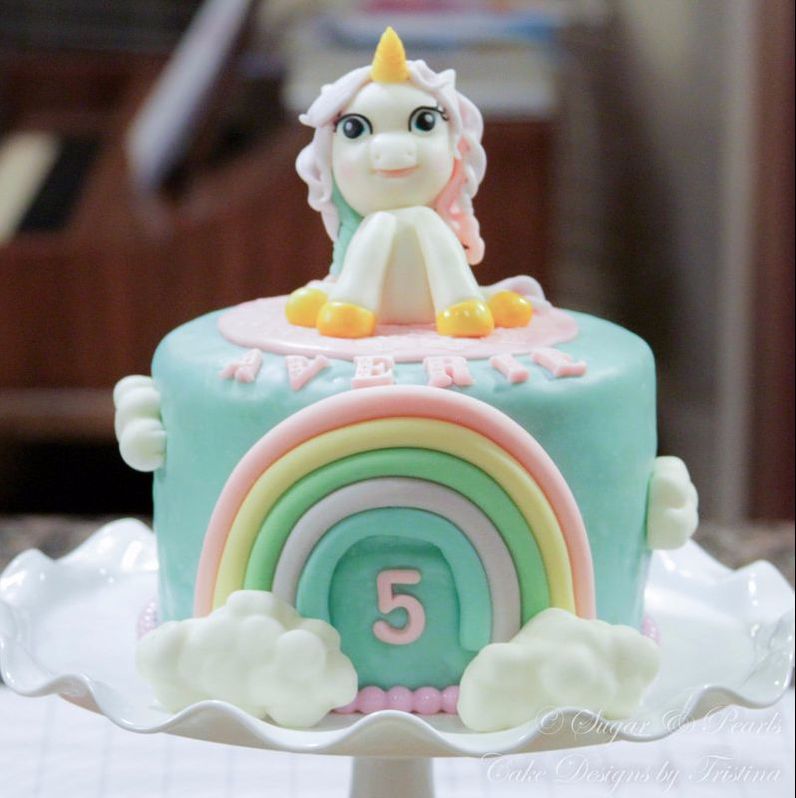
This is a 6-inch, four-layer dark chocolate cake with chocolate mouse filling and frosted with chocolate buttercream. I turned this cake into a "secret" cake where I added a handful of pink sixlet pearls in the middle so they would spill out when Averie cut the cake. I punch two small circle using the round cookie-cutter on layer #2-3 to achieve this. I attempted to make the edges relative stiff to ensure the cake holds up the fondant covering better, which it did very well. I covered the cake with turquoise fondant the traditional way, and then trimmed the excess fondant around the cake.
This is a 6-inch, four-layer dark chocolate cake with chocolate mouse filling and frosted with chocolate buttercream. I turned this cake into a "secret" cake where I added a handful of pink sixlet pearls in the middle so they would spill out when Averie cut the cake. I punch two small circle using the round cookie-cutter on layer #2-3 to achieve this. I attempted to make the edges relative stiff to ensure the cake holds up the fondant covering better, which it did very well. I covered the cake with turquoise fondant the traditional way, and then trimmed the excess fondant around the cake.
I wanted the unicorn to stand out from the cake, so I made a round pink "fondant lace" for it to sit on. Then, I added the rainbow to the front side of the cake, following by the 2 cloud puffs on the two ends of the rainbow. I placed the birthday girl's name around the front of the cake, mirroring the rainbow shape. After that, I added a string of purple pearl fondant around the bottom edges of the cake. I finally finished the cake with the number 5 pink fondant in the middle underneath the rainbow.
|
|
With the hypes about the unicorns, I can now say that I have made a unicorn (two actually) cake. Doesn't the unicorn look too cute to eat? Curious about the other unicorn cake, check it out at the Unicorn Buttercream Cake!
My daughter loves the cake, and does not want to eat it at all. Although she has tempted to eat all of the frosting when we pulled off the fondant, and of course the pink sixlet I hid inside the cake. I really enjoyed making these fondant figurines where I can still keep the topper after the cake is long gone eaten.
Seriously, I still have the unicorn and the rainbow lying on the kitchen counter at home right at this moment.
As you may already know, but I love making these girly cakes. They are so "inspirational" to make and there was never a dull moment in molding a single piece of fondant figure for this cake. While making this cake, I just realized how much I still love making these cake toppers...the more challenging the sculpture, the bigger the self-fulfilled feeling I have after I finished the cake. This feels just like home to me, and I'm loving it.
xoxo,
Tristina
xoxo,
Tristina
COPYRIGHT © 2017 - SUGAR & PEARLS ~ CAKE DESIGNS BY TRISTINA
