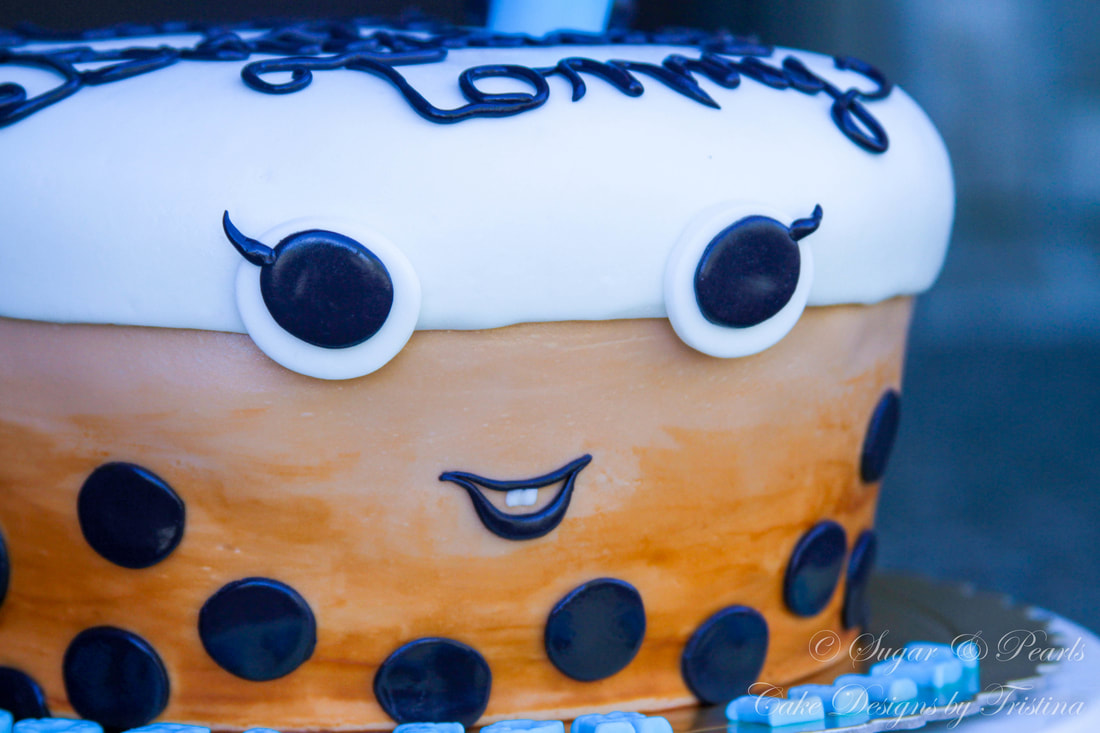
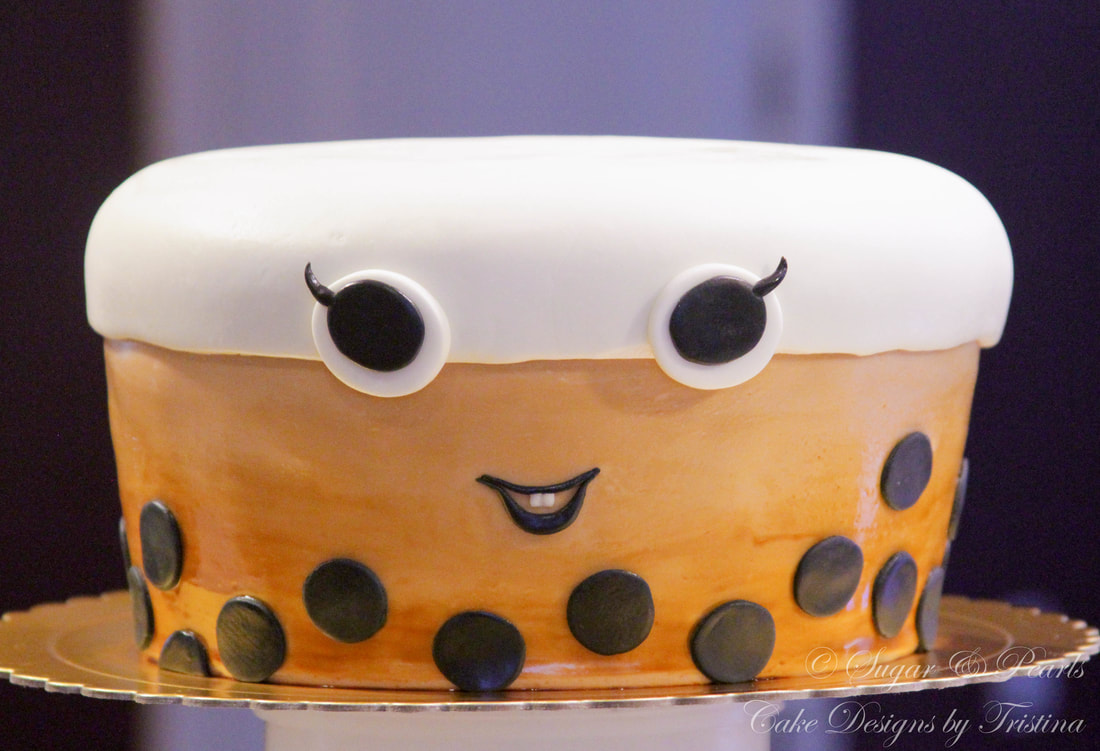
Do you want to do something a little out of the ordinary? Or perhaps making a fun and easy cake that everyone would love for your next event? This cake is just right for you if you are in a time crunch but still wanting to make a cake to impress your family and friends. This Boba Milk Tea cake is super adorable and takes less time than most fondant cakes that I had previously made. The fun thing is that you will get to hand paint the cake in any bubble tea flavor or color that you like, and boy, the options are endless. Boba is also known as bubble tea or pearl milk tea, and is a Taiwanese sweet drink invented back in 1980s. The milk drinks often contained a tea-based mixed with fruit or milk. And the chewy tapioca pearls and/or fruit jelly are often added, which then are sucked up through extra large straws. This drink is so refreshing during any time of the year, but is especially popular during the summertime. There are numerous variety of milk tea flavors. My husband enjoys green-tea while I like the classic flavor more. My kids are not the biggest fan of milk-tea just yet. They would drink strawberry flavored with jelly-based, but do not like the chewiness of the tapioca pearls. For this cake here, I wanted to mimic one of the most popular flavors which is bubble milk tea with black tapioca pearls. 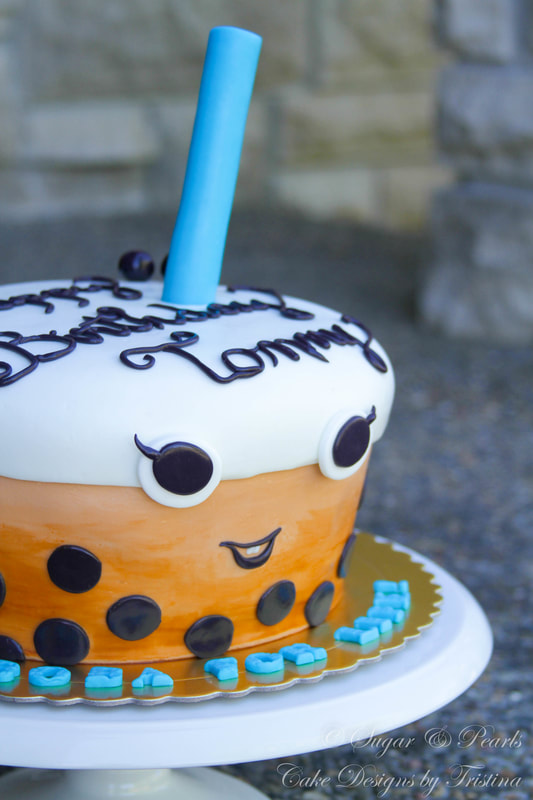 DECORATIONS PREPARATION This cake is made for a teenager boy who loves Boba Milk Tea. I started out by making the straw first because I need it to hold the shape when used on the cake. For this type of structure, it is best to start the toppers at least 3-4 days before the decorating day to allow the toppers to dry properly. The second thing I prepared for this cake was the black tapioca pearls. I rolled a 1/8-inch black fondant out and punch circles using the smallest round cookie-cutter I have. I made about 25 of these pearls just in case I needed more at the end. Some of them were cut in halves as well. I decided to create these pearls ahead of time not because I had to, but because I wanted to be able to do less on the decoration day, and still be able to spend some quality times with the family. I thought it was wonderful to have clients pick up the cakes on Monday now because it allows me to make the cake throughout the weekend, and not feeling pressured or rushed at all.  Using the similar technique, I punched out 2 circles of white fondant and 2 smaller circles of black fondant to make the eyes. For the eyelashes, I just rolled a very thin black fondant and pinched the ends lightly, and glued them to the black eyes. I also rolled 2 thin strips of black fondant and curved them up to make the upper lip and the lower lip of the mouth. I also added the smaller piece of rectangular white fondant in the middle to represent the 2 front teeth. And that is all I needed to prepare for this cake. Simple and easy. ASSEMBLE THE CAKE This is an 8-inch one-tier cake with four layers of chocolate cake made from scratch. I was going to make three-layer cake but this design fits a taller cake better, so I went with four layers instead. The tricky thing about this cake was that I need to re-shape it into a "cup" so the I had to cut the bottom of the cake slightly smaller than the top. I have not done this before, and it was so much easier than my imagination. First, I stacked the cake layers on top of each other, alternating with whipped chocolate buttercream. I put the cake in the fridge for about 1-2 hours to harden before shaping it into a cup. I started out by cutting the two sides (left and right) to the desirable size, and then trimmed around the cake. Once I have achieved a completely round cake with a "cup" shape, I then frosted the cake with the entire chocolate buttercream and then chilled the cake overnight. To cover the cake with fondant, I chose a light brown color for the milk tea as requested. I used a 1/3 inch thick rectangular fondant and wrapped it around the sides of the cake. Then, I used a white round fondant to make a cup "topper." I made sure I used the circle about 1.5 inch bigger than the cake itself to cover around the rims. It's time to add all those extra details to make the Boba Milk Tea cup comes to live! I added the eyes first, following by the mouth and the teeth on the front of the cake. Then, to give an orange-brownish color to this milk tea, I painted the bottom of the cake using a mixed of orange and brown food coloring. The idea is to make the milk tea color becomes lighter as it teaches the top of the cup. Lastly, I placed the black tapioca pearls sporadically around the bottom of the cups. Noted that these are meant to be uneven as the pearls are not a perfect round shape. I want to make sure the straw could stay up and hold its shape through an hour drive in route. I used my smallest cookie-cutter to cut out the top white fondant covering, where I wanted to place the straw at. I removed this fondant from the cake. Then, I pushed a real straw through the cake first and placed the fondant blue straw over it. I cut the height of the real straw just slightly shorter than the fondant blue straw so it is not invisible by looking from the top. I thought this trick hold the fondant straw really well. 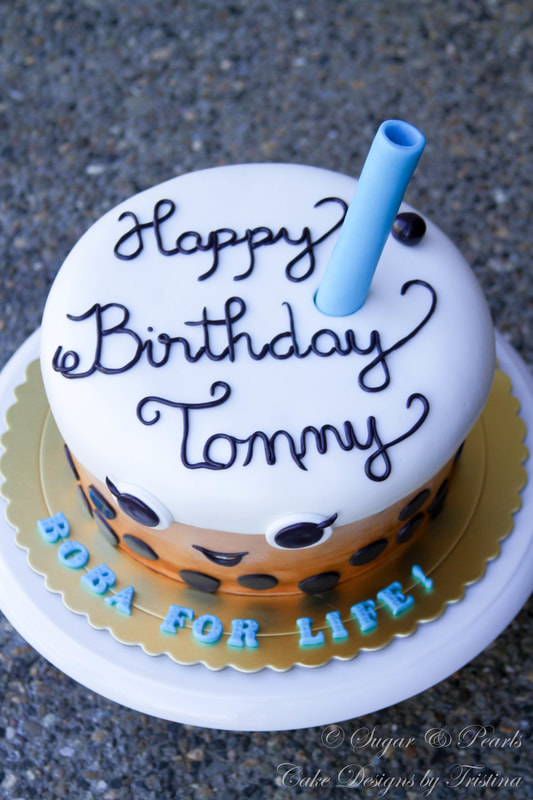 To complete the mother's request, I added the "Happy Birthday Tommy" wording using the thin, rolled out black fondant strips and finished the cake with 2 black tapioca pearls on the top of the cake, just right behind the blue fondant straw. I also used the same blue fondant to mold the words "Boba For Life" and placed on around the front of the cake. 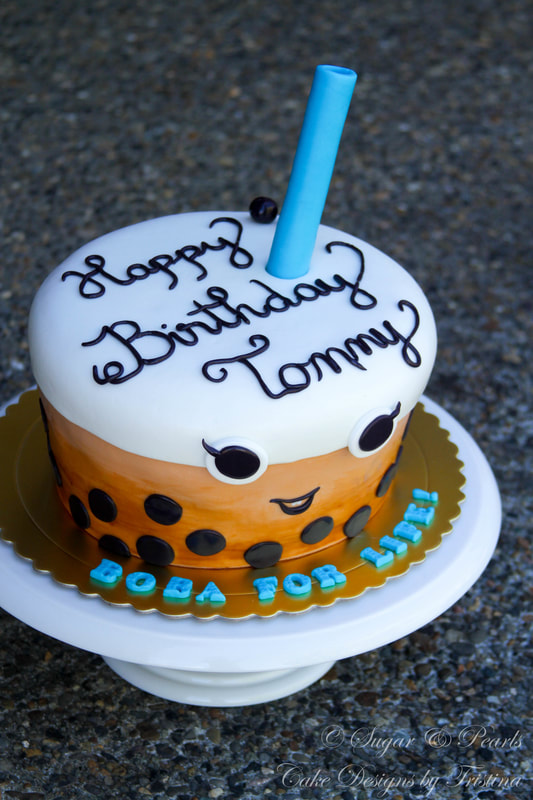 Isn't it a fun, simple and easy cake to make? I loved how simple this cake is yet it brings out a whole new level to my cake designs. As far as I know, this is one of the few Boba Milk Tea cakes around the web and Pinterest. I think the best thing about this cake that I was able to spend time to create it, while also involved with all of the weekend activities with my family. The bonus was that I did not feel pressured with the time at all. I am so looking forward to making more cakes like this in the future months. Now, bring on those simple and fun cake requests! xoxo, Tristina COPYRIGHT © 2017 - SUGAR & PEARLS ~ CAKE DESIGNS BY TRISTINA
0 Comments
Your comment will be posted after it is approved.
Leave a Reply. |
AboutTristina TiepNhu Nguyen is a pharmacist by weekday and a baker by weekend. She is also a wife and a mother of two children. Free Cake Tutorials!Sign up for my newsletter and you will be the first to know about my new recipes and cake tutorials!
Recent Posts
August 2020
RecipesTutorials |
|
|
sugar & pearls |